Background
In order to settle trades executed against a counterparty, the counterparty (Account) in question must have one or more Beneficiaries set up for each of the currencies they will be trading.
A Beneficiary represents a bank account owned by a particular individual/entity that is associated with your counterparty. Each Beneficiary can have one or more settlement methods associated with it, which define the mechanism for how funds are paid into, or received from, the bank account (e.g. wire, cheque, etc).
When making payments to, or receiving funds from, a counterparty, Kooltra users can specify which Beneficiary (bank account) the funds will be sent to / received from, as well as the mechanism by which the funds will be sent (settlement method).
Adding a Beneficiary
To add a Beneficiary for an Account, follow the steps below:
-
Go to Settlements → Beneficiaries in the left-hand navigation panel. From here you can see a list of all Beneficiaries already configured in the system.
-
In the top-right corner, click Create New Beneficiary.

-
In the screen that loads, enter:
- the Account (counterparty) you wish to assign the Beneficiary to
-
the name of the Beneficiary
-
the currency the Beneficiary will be applicable to
-
(Optional) mark the Beneficiary as a Third Party or set them as the counterparty's default Beneficiary for the chosen currency.
Once these details are complete, click Create at the top.

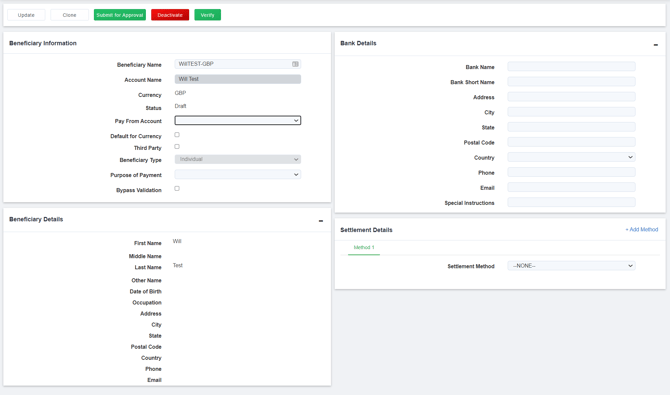
Once the Beneficiary has been created, you will automatically be redirected to a page to populate further details before submitting for back office approval. Each of the fields in this page are described in the section below, Updating a Beneficiary.
A newly created Beneficiary will have a status of Draft until that Beneficiary is either approved or rejected. A Beneficiary must be approved before they can be used to make payments / receive funds.
Updating a Beneficiary
-
Before submitting a Beneficiary for approval, users should specify:
-
Pay From Account - the Nostro to use when making payments to this Beneficiary
-
Purpose of Payment - the reason for sending funds to / from the Beneficiary
-
Bank Details - the details of the bank account associated with the Beneficiary
-
Settlement Details - methods of settlement available for the Beneficiary (e.g. wire, cheque, etc)
-
Beneficiary Details - details of the individual Beneficiary
Further tabs are available at the top of the page for: - Additional Info - (Optional) used to specify if the Beneficiary is acting on behalf of someone else, and who the ultimate Beneficiary is
- Documents - used to upload and store any documentation relevant to the Beneficiary
- History - a log of changes made to the Beneficiary record
Important note: anytime you make an update to a Beneficiary, before navigating away from the page you should click the Update button at the top left to save any changes that have been made.
-
- Submit the Beneficiary for approval. Front office users are able to send Beneficiary’s for approval by clicking on the ‘Submit for Approval’ button at the top of the page:

- Back office users are able to approve a Beneficiary by clicking on the Verify button, or reject a Beneficiary by clicking on the Reject button if there is missing / incorrect information or if the Beneficiary is not legally allowed to be paid into / received from.
