Any trade that is booked in Kooltra against a client with Counterparty Type of ‘Payments’ will be displayed by default on the Payments Dashboard for gross settlement.
To access the Payments Dashboard click on Settlements -> Payments Dashboard in the navigation panel.

Filters
The filters available at the top of the Payments Dashboard are:
-
Trade Date - filters the results on the page by the specified Trade Date
-
Expected Date - filters the results on the page by the specified Expected Date, which is equivalent to the Value Date of the cashflows associated with the trade
-
Pending Payments - filters the Payments Dashboard to either show:
-
Only trades with outstanding pending payments (Pending Payments)
-
Only trades that do not have outstanding pending payments (No Pending Payments)
-
All trades (ALL)
-
-
Completed Payments - filters the Payments Dashboard to show either:
-
Partial Payments Complete - only show trades that have been partially funded
-
All Payments Complete - only show trades that have been fully funded
-
No Payments Complete - only show trades that have not been funded
-
ALL - show all trades
-
-
Search - allows the user to search the Payments Dashboard for a particular trade ID or Client
-
Expected Currency - filters the Payments Dashboard for only trades with the specified receipt currency
-
Currency to Pay - filters the Payments Dashboard for only trades with the specified payment currency
-
Show Completed Transactions - if this is checked then the Payments Dashboard will display any trades that have already been marked as completed
-
Show Non-Payment Transactions - if this is checked then the Payments Dashboard will display any trades associated with accounts that are not of settlement type Payments.
Payments Dashboard Workflow
From the Payments Dashboard, you can initiate a payment by selecting a specific trade.
- Click on the Trade ID associated with the payment.
- This will open the Trade Ticket in a new browser tab, as shown below.

From this screen users are able to view cashflows associated with the trade in question, make payments, receive payments, view client cash accounts, add documentation relevant to the trade and send confirmations. Each one of these actions has its own section (tab) in the top menu, described below.
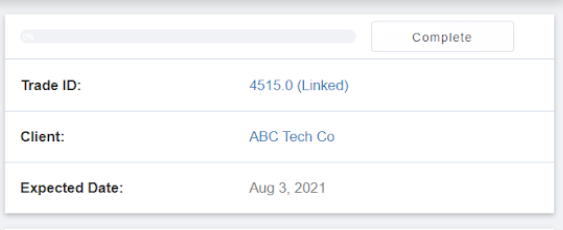
There are four summary cards on the right hand side of the page that allow you to view payment details at a glance.
The card at the top shows the payment status of the transaction, which updates as payments are made. Once all payments have been made and received, the user can click the complete button to mark the trade as settled. Below the payment status of the trade is the Trade ID, Client (Account) and Expected Date (settlement date). Both Trade ID and Client are clickable and will open up the associated trade/account details.
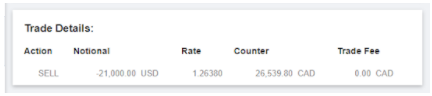
The next summary card provides an overview of the trade details, showing the trade direction, notional amount, rate, counter currency amount and any trade fees:
The final two summary cards display the buy and sell side details of the trade respectively. This includes:
-
The amount owed by the Client
-
Any Transaction Fees associated with the trade
-
The total amount expected from the Client
-
The total amount received from the Client
-
Any outstanding amounts owed by the Client
-
The amount purchased by the Client
-
Pending payments
-
Completed payments
-
Available amount
Cashflows Tab
The first tab in the top menu of the payments workflow is the Cashflows tab. This tab allows users to view all incoming/outgoing cashflows (payments) made, with the details of each payment viewable by clicking on the associated Cashflow ID.

Receive Funds Tab
The Receive Funds tab allows you to specify the amount and type of payment that was received from the purchasing Client.

To receive funds:
-
Specify the Deposit Type in the drop-down at the top of the page
-
In the card that loads in the bottom section of the screen, enter the Payment Information.
-
Click ‘Receive Funds’. This will result in another Cashflow being created in the ‘Manage Funds’ blotter at the top of the page.
-
Click ‘Complete’ on the Cashflow line item created in step 3. In the resulting window that launches, verify all details are correct and click ‘Process Immediately’ at the bottom.
- The cashflow status will now be updated to ‘Closed’ with the amount received added to the Total Received (seen in the summary cards on the right of the screen)
Note: to receive funds, you must specify the Receiving Bank Account and the Source (Beneficiary). If you do not have bank accounts or beneficiaries set up, please read through the bank accounts and beneficiaries' documentation. Multiple payments can be received for a single trade.
Payments Tab
The Payments tab allows users to specify the amount and type of payment for the Client's beneficiaries. To make a payment, follow the same steps outlined in the ‘Receive Funds Tab’ section above.
Note: to make a payment, you must specify the Paying Bank Account and the Beneficiary. If you do not have bank accounts or beneficiaries set up, please read through the bank accounts and beneficiaries' documentation. Like Receive Funds, multiple payments can be made for a single trade.
Cash Accounts Tab
The cash accounts tab allows users to review the client's cash balance by currency. It also summarizes the balances after the trade has been made and the balance after payments have been made:

By clicking on a currency in the left-hand column of the Client Cash Accounts table, users are able to view the historical balance on the relevant currency account for a specified time period:

Documents Tab
The Documents tab allows users to upload any documents relating to the trade or associated payments. To upload a document, select the file using the ‘Choose file’ button, then click on the green ‘Upload’ button. Any files that have been uploaded will show up in the card below. Files can also be deleted by clicking on Delete.
Confirmation
This is an optional native Kooltra functionality that allows users to send trade and wire confirmations to clients. Click here to learn more about this feature.
Completing a Payment
Once a payment is complete, you can click on the Complete button in the top summary card. This will mark the payment as complete and will remove it from the Payments dashboard (unless the filter Show Completed Transactions is checked).